
As the leaves start changing and the air gets crisp, nothing feels cozier than curling up with a new knitting project.
Like most knitters, autumn (or fall!) is my favorite time of year. And what could be more perfect for this season than a cute knitted pumpkin?
This knitted pumpkin pattern is easy to make and can be finished in under a couple of hours. It’s also a great way to use up some of those yarn scraps. And it’s knit in the round, so there’s no seaming!
So if you want to learn how to knit a pumpkin then keep reading for the free pumpkin knitting pattern, with a beginner-friendly step-by-step pattern tutorial!

Some of the links on this page are affiliate links. I may earn a small commission if you use these links to make a purchase, at no extra cost to you! I hope you find this information useful, and thanks for your support.

Materials and Tools You’ll Need For this Pumpkin Knitting Pattern
To make this free pattern you’ll need:
- Worsted weight yarn
I used around 45 yards (40 metres) of Cascade 220 in the shade Jack O’Lantern (7824) for each of the two orange mini pumpkins.
The large green pumpkin was made with Paintbox Yarns Recycled Cotton Worsted held double to make it a chunky weight. This pumpkin used about 85 yards (78 metres) of worsted weight yarn.
If so if you wanted to use a chunky or bulky weight yarn you’ll need around 45 yards (40 metres). - Needles for knitting in the round
For the worsted weight mini pumpkins I used Chiaogoo Twist Shorties to make a little 9″ (22.5cm) circular knitting needle in size 4 mm.
For the larger pumpkin using chunky/bulky weight yarn I used 16″ circular needles (40 cm) in size 6.5 mm.
You’ll also need:
- Polyfil or toy stuffing
- Cinnamon stick or a regular stick or twig
- Stitch marker
- Tape measure
- Scissors
- Tapestry needle
Gauge
The small orange pumpkins use a gauge of 5 stitches and 7 rounds per inch in stockinette stitch.
I’ve used a smaller needle size than recommended for the yarn weight to create a tighter stitch for this pumpkin pattern. This is important because we will be stuffing the pumpkin fairly generously, and we don’t want any of the stuffing to show through loose stitches.
Size
At the given gauge, these pumpkins will measure around 3 1/2 inches (9 cm) in diameter, and about 2 inches (5 cm) tall.
If you want to make a larger pumpkin, use thicker yarn and bigger needles.
In these photos, the green pumpkin was made using worsted weight held double, and 6.5 mm needles. It ended up being 5 1/2 inches (15 cm) in diameter and 3 inches (7 cm) tall.
The white pumpkin was made with a mystery chunky weight yarn from my stash, and 5.5 mm needles. It ended up a little smaller than the green pumpkin, at about 5 inches (13 cm) diameter.
Ultimately, the size of your pumpkins will depend on the gauge you’re using and the amount of stuffing you use.
It’s a pretty flexible and forgiving pattern, so have fun and experiment with whatever you can find in your stash to use up those scraps!
I’d love to see a jumbo pumpkin using super bulky yarn!
Difficulty
These easy pumpkins are very beginner friendly.
You’ll need to know how to knit and purl, and work in the round.

Knitting Techniques and Tips
This knitted pumpkin pattern is a lovely, easy knit.
To make these cute pumpkins you knit a little tube, and then cinch the bottom opening closed. Fill it with stuffing, close the top, and then wrap yarn through the middle of the pumpkin and over the purl columns to create the segments of the pumpkin.
There’s no increasing or decreasing so it’s an easy and quick knit. This makes it a perfect project for beginner knitters or if you just want an easy to follow project.
Here are the techniques and abbreviations you’ll need for this pumpkin knitting pattern:
- CO: Cast on
- K: Knit
- P: Purl
- PM: Place marker
- Rep: Repeat
- RS: Right side
- St(s): Stitch(es)
You’ll also need to know how to knit in the round to make these pumpkins.
I love to use 9 inch circular needles for small circumference knitting, but if that’s not for you then you can use DPNs or use the magic loop technique.
I found it useful to use a long, sharp tapestry needle for making up the pumpkin. It made it a lot easier to poke the needle through the middle of all the stuffing. The type I used is called a sharp yarn darner.
If you don’t have a sharp needle, a blunt one will still work. Before I dug out my sharp tapestry needle I used a spare straight knitting needle to poke a guide hole through the middle of the pumpkin first to make it easier for the tapestry needle to find its way.
Sometimes, after you’ve sewn everything up you might find that some of your pumpkin segments look a little misshapen. If this happens, take a crochet hook or a spare straight needle and insert it into the misshapen segment and move the stuffing around until it looks right.

Step-by-Step Instructions for the Knitted Pumpkin Pattern
Knitting the Pumpkin
CO 42 sts leaving a tail of around 6-8 inches. You’ll use this to close the little hole at the base of the pumpkin.
Place marker and join yarn to begin knitting in the round, being careful not to twist the stitches.
Round 1: (k5, p1) around.
Repeat this round until the work measures 4 to 5 inches (10 to 12 cm) from the cast-on.
If you’re using chunky or bulky weight yarn, work to around 6 inches (15 cm).

Making up the Pumpkin
At this point, remove your marker and cut the yarn leaving a long yarn tail, around 45 to 50 inches (115 to 130 cm).

If you don’t want to measure, I loosely wrapped the yarn around the circumference about 5 or 6 times and that worked well for me.
Leave the stitches on your needle, and thread your tapestry needle with the cast-on tail.
Sew a running stitch around the cast on edge. Then pull it tight to the inside of the tube to close the opening and sew the bottom up.

Tie it off, and tuck the end inside the tube. You can weave it in and trim it if you want to, but since we’re going to be stuffing and closing up the inside, I just leave it loose.

Thread the long length of the cut working yarn through the tapestry needle. Then, pass the needle through the stitches on the knitting needle, removing them as you go.

Once all the live stitches have been transferred to the long length of yarn, the pumpkin is ready for stuffing.

Start adding small amounts of toy stuffing to your pumpkin. Be generous so you get a nice firm pumpkin, but be careful not to overstuff.
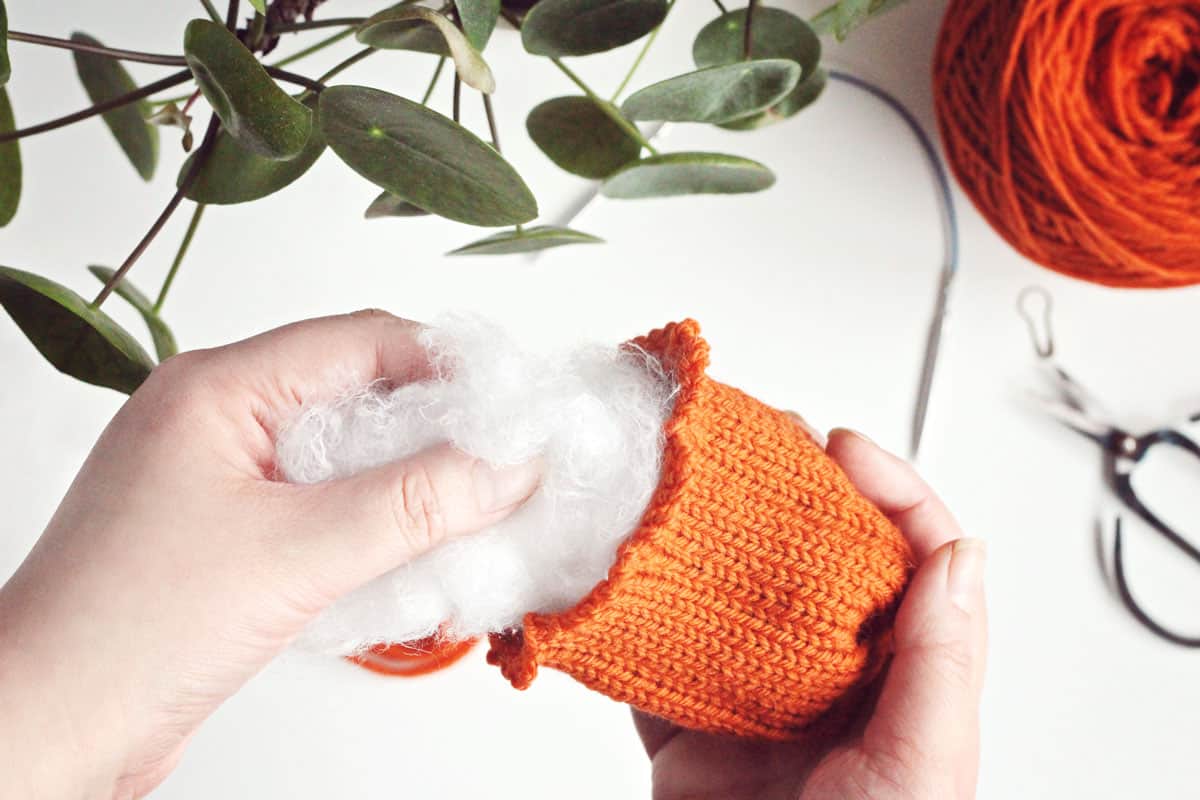
Once you’ve finished stuffing, you should have a neat, round little ball, and the purl stitch columns should be a lot more visible.

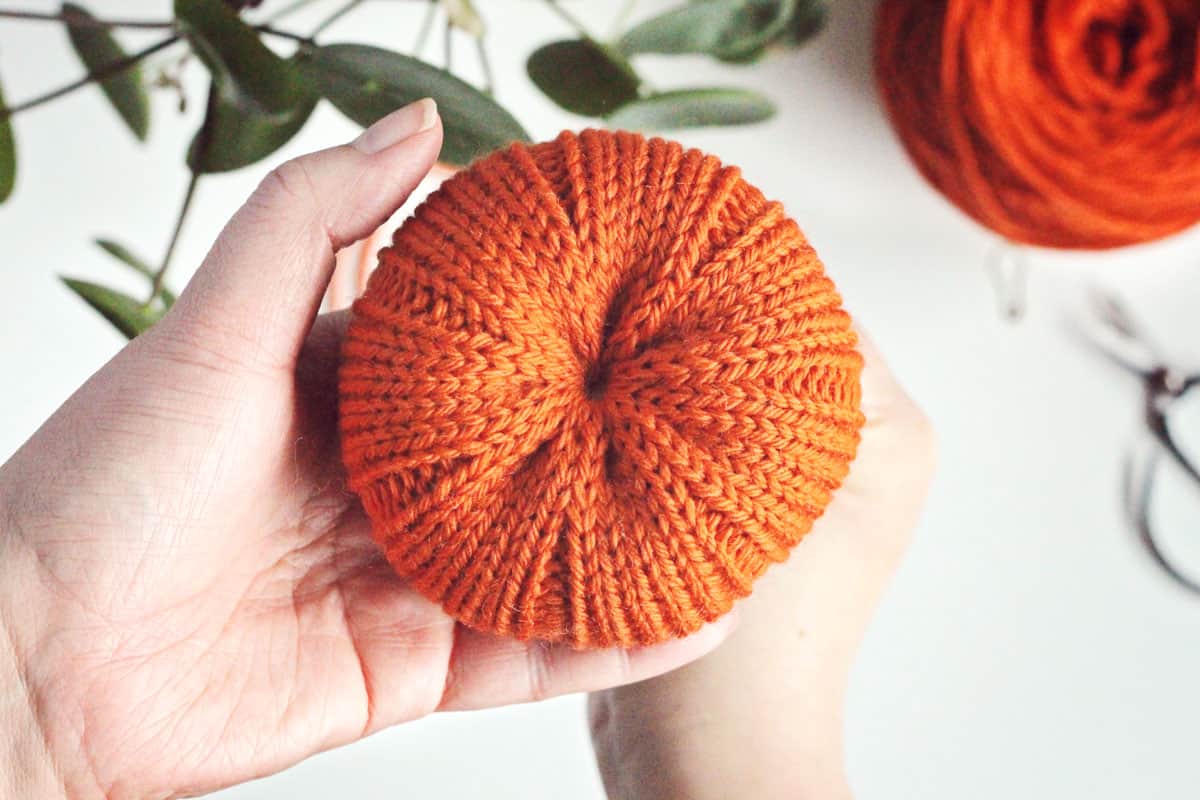
Next, gently pull on the yarn end to gather the stitches and close the top of the pumpkin.

Now, it’s time to start shaping the pumpkin.
Take the tapestry needle and push it down through the pumpkin’s top, right through the center, and out of the bottom.

Pull tight to create the pumpkin shape.
Keeping the yarn taut, bring it from the bottom opening, and wrap it around the outside to the top of the pumpkin again, following the line of one of the purl columns.
Push the needle back through the middle of the pumpkin, bringing it back out at the bottom.
Repeat this step again, tracing the yarn along the next purl column and pulling the needle back through to the bottom.
Keep pulling the yarn tight, but not so tight that it breaks!

Do this all around the pumpkin until all the purl columns have been cinched in to make the ridged pumpkin segments.
When all the purl columns are done, secure the yarn at the bottom of the pumpkin, and cut off any excess yarn.
And you’re done!
All that’s left is to add a little stem to the top.

Attaching the Pumpkin Stem
I used a chopped up cinnamon stick for my pumpkins.
You can glue it in place with hot glue, but I just poked mine into the top of the pumpkin so that I could switch them out easily when the scent fades.
For the green pumpkin, I used a dried-out stalk from a real pumpkin that we picked from our local pumpkin patch last year, and I love the way it looks!
In fact, I love it so much that I’m now planning to save a few more pumpkin stalks this year so I can add more knitted pumpkins to my woolly pumpkin patch.
Customising Your Pumpkin
This is a flexible pattern, so have fun with it and play around to get slightly different shaped pumpkins that you’re happy with.

The pumpkins in this picture used the same yarn and needle size and the same number of cast on stitches.
The pumpkin on the left was knit to around 4 inches, while the one on the right was closer to 5 inches. I also pulled the yarn a little tighter when making the ridges for the left pumpkin.
You can see how a few little changes can make a big difference in your finished pumpkin!

If you don’t need the step-by-step tutorial, here’s the free knit pumpkin pattern written out for you:
Free Pumpkin Knitting Pattern

SKILL LEVEL: Beginner
SIZE: One Size
FINISHED MEASUREMENTS (approx.):
2” (5 cm) high
3.5” (9 cm) diameter
YARN: Worsted weight yarn:
45 yds/40 m MC
Shown in Cascade 220 (Worsted weight: 100% Wool: 220 yds/200 m per 100g/3.5oz)
1 ball in Jack O’Lantern (7824)
NEEDLES:
4 mm (US 6) needles for working in the round
Or size needed to obtain gauge
GAUGE:
5 sts x 7 rnds = 1 inch (2.5 cm) in stockinette stitch worked in the round
NOTIONS:
Stitch marker, tapestry needle, Polyfil or toy stuffing, cinnamon stick or twig, tape measure, scissors
DIRECTIONS
CO 42 sts leaving a tail of around 6-8 inches (15 to 20 cm).
Join to work in the round, being careful not to twist. PM to mark the beginning of the round.
Round 1: (k5, p1) around.
Rep this round until the work measures 4 to 5 inches (10 to 12 cm) from the cast-on.
Remove marker and cut yarn leaving a long yarn tail, around 45 to 50 inches (115 to 130 cm).
Leaving the stitches on your needle, thread the tapestry needle with the cast-on tail.
Sew a running stitch around the cast on edge. Then pull it tight to the inside of the tube to close the opening. Secure the yarn, and tuck the end inside the tube.
Thread the working yarn through the tapestry needle. Pass the needle through the stitches on the knitting needle, removing them as you go.
Stuff the pumpkin, being careful not to overstuff.
Pull on the working yarn end to gather the stitches and close the top of the pumpkin.
Take the tapestry needle and push it down through the pumpkin’s top, right through the center, and out of the bottom. Pull tight to create the pumpkin shape.
Keeping the yarn taut, bring it from the bottom opening, and wrap it around the outside to the top of the pumpkin again, following the line of one of the purl columns. Push the needle back through the middle of the pumpkin, bringing it back out at the bottom.
Repeat this step all around the pumpkin, tracing the yarn along the next purl column and pulling the needle back through to the bottom.
When all the purl columns are done, secure the yarn at the bottom of the pumpkin, and cut off any excess yarn.
Attach a cinnamon stick or a twig to the top of the pumpkin for the stem. Hot glue into place if desired.

I hope you’ve enjoyed this knitted pumpkin pattern!
If you knit these pumpkins, please tag me on Instagram. I’d absolutely love to see the cute pumpkins you’ve made!